So your account is a mess and your search terms are not isolated. You want to restructure. Up until today, that was a significant undertaking. Fortunately, now Prestozon Rules makes it easy to restructure your account for perfect search term isolation. (Not sure what search term isolation is?) This post will review how to transition.
The goal here is to extract all of the knowledge from the old campaigns into new campaigns with a clean structure. Here’s the step-by-step:
1 – Pick the SKUs you want to restructure
The first step is to pick which products you want to transition over. You don’t necessarily have to transition everything at once.
First pick a product (or group of products that are relevant to the same search terms). They don’t have to have been advertised in the same campaigns previously – that’s what we’re cleaning up!
Our general recommendation is to pick all products that are relevant to the same search terms. If you split up products that are relevant to the same search terms into several different campaigns, then you can’t achieve search term isolation. There are advanced situations where this is acceptable, but the majority of the time it is better to put all of these SKUs in the same place.
2 – Set up the new campaigns
We recommend using a simple structure that makes search term isolation easy – Auto, Research, and Performance. You can use our 1-Click Setup Feature to create our ideal structure. If you don’t want to use the 1-Click setup or just want to learn more about the structure, keep reading this section below, otherwise you can skip to Step 3:
Go into Seller Central or AMS and create the following structure, replacing “Product Group 1” with whatever you want to call your product group (for example, “magician’s cape”):
- Campaign: Product Group 1 – Auto
- Ad Group: Ad Group 1
- Ad: Product 1
- Ad: Product 2
- Ad: Product 3
- Ad Group: Ad Group 1
- Campaign: Product Group 1 – Research
- Ad Group: Ad Group 1
- Ad: Product 1
- Ad: Product 2
- Ad: Product 3
- Ad Group: Ad Group 1
- Campaign: Product Group 1 – Performance
- Ad Group: Ad Group 1
- Ad: Product 1
- Ad: Product 2
- Ad: Product 3
- Ad Group: Ad Group 1
No need to add keywords at this point, unless you already have some you know you want to research. In that case add them to Product Group 1 – Research – Ad Group 1 as broad or phrase match, depending on which match type you’re using for research. We generally recommend Phrase if you already have a good understanding of your keywords.
Budgets
You should set the budgets based on how aggressive you want to be. If you’re taking it slow, set budget to 25% or 50% of what you’re currently spending to advertise these products. If you’re aggressive, set it to 100% of what you want to spend on this product group.
Budget Distribution: If you have a lot of data on these products, put more of the budget into the Performance campaign. If you don’t have a lot of data, put more of the budget into Research and Auto.
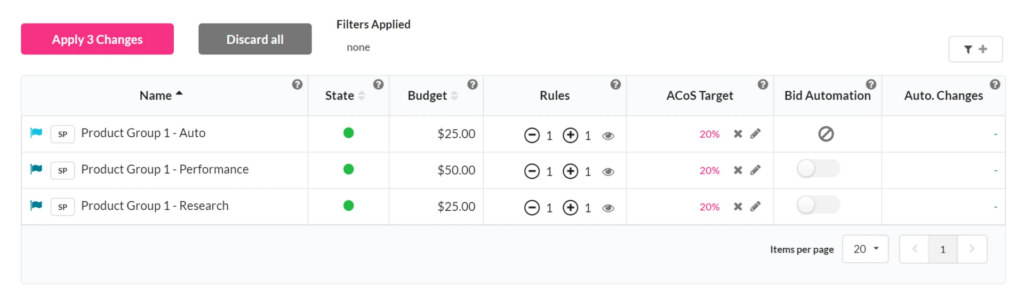
Setting ACOS Targets
Once you’ve set the campaigns up in Amazon, come back to Prestozon and set your ACOS targets. It’s important to do this before setting up rules because the ACOS targets are used to suggest bids for new keywords
3 – Set up the Rules
Now comes the magic. Set up one New Keyword rule and one Negative keyword rule for the product group. This will extract all the data from the old campaigns and set up the new ones with the right keywords with the right bids! If you skipped to this section after creating your campaigns via the 1-Click Setup, then your rules are already created. You should still read below to learn how to add your old ad groups to these existing rules in order to extract the data from them.
New Keyword Rule
For the new keyword rule, all of the original campaigns should have their step 3 checkboxes checked so that they are used as source data for the new campaigns. The new campaigns should be set up for Search Term Isolation. See the example below. No need to start keywords in the old campaigns as you will be phasing them out.
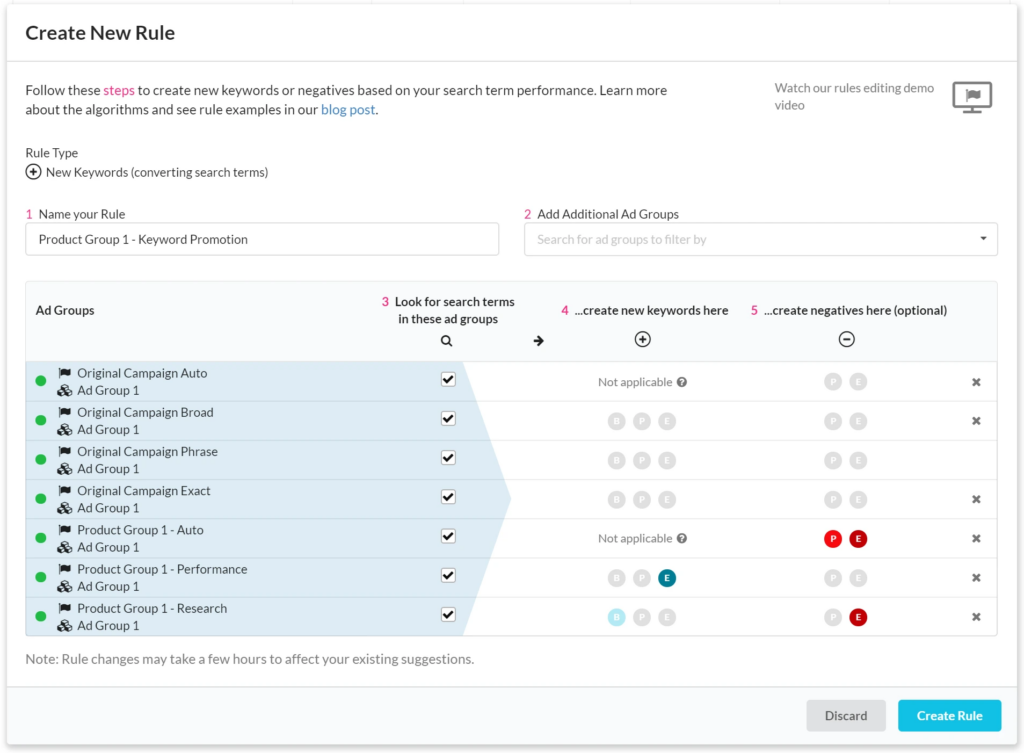
As you can see, you’ll want the new campaigns checked in step 3 as well – this is because the data you start collecting from the new campaigns will also be relevant to the search term decisions and you want to have the algorithm consider that data.
Hint
Amazon only allows negative phrase keywords to have 4 parts (individual words in the keyword), so it’s a good idea to start negative exact as well as negative phrase in the auto group in case a long search term can’t be started as negative phrase. Negative exact keywords can have up to 10 parts, so if a negative phrase is longer than 4 words, at least you’ll be negative-ing the exact version of the search term.
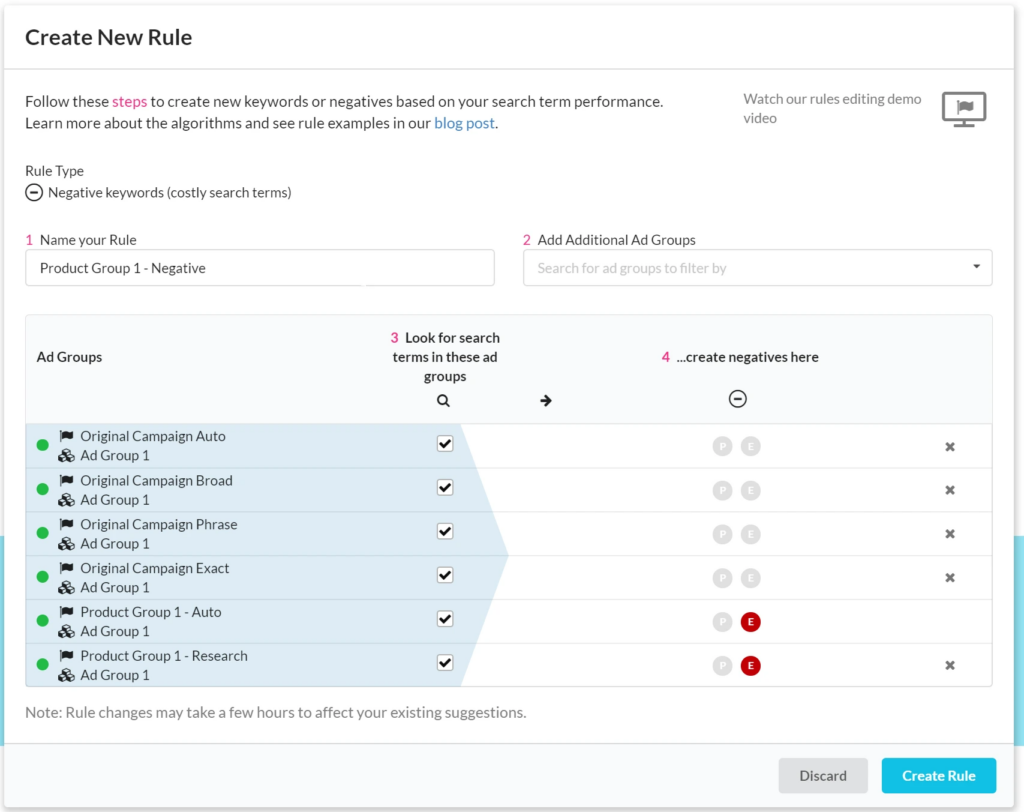
Negative Keyword Rule
For the negative rule, we want to look at all of the old campaigns for costly search terms and make them into negative exact keywords everywhere.
Notice that in the example below the new Performance campaign is not included. Ad groups that only have exact match keywords that have converted (like the Performance campaign) should not be managed with negatives. Instead use bid automation to manage performance.
Once the rules are created, go to Suggestions > Keywords and search for the new campaigns. If you’ve had sales in the last 90 days in the original campaigns you’ll see keyword suggestions there. (There might be a slight delay between saving the rule and the suggestions being generated.)
Accept all of those keyword suggestions, then go to the Negative suggestions page and accept all of those.
Now your new campaign structure is all set up and filled with keywords and negatives!
4 – Monitor, Pause, and Transition budgets
Give your campaigns a couple days so you can see how they’re doing. Amazon is much faster at ramping up new campaigns these days.
Ideally, they’ll be performing as well or better than your old campaigns. If everything looks good, go ahead and pause your old campaigns and set your new campaign budgets to your target.
If you want to take it slower, turn down the original campaign budgets every few days until they are at $1 and turn up your new campaign budgets until they’re at your target budgets. Once the budgets are fully transitioned over, you can then pause the old campaigns.
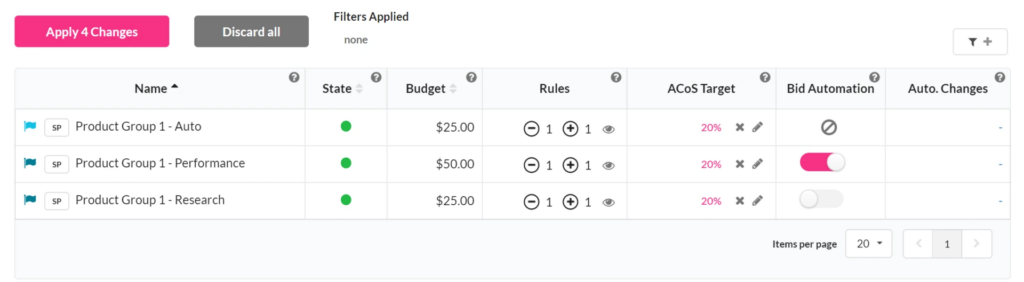
5 – Turn on Automation
You’ll want Prestozon to keep on top of bids for your performance campaign, so go to Campaign Manager and turn on Automation.
If you want to review changes before they’re made, don’t turn on Automation and just be sure to check Bid Suggestions regularly.
All done!
Now you’ve got everything you need: the perfect search term isolation structure for your product group, rules to promote any new search term that converts, and bid automation to help your performance campaign achieve your ACOS goal.
We hope you enjoyed this strategy post. Feel free to leave any questions in the comments!
Original post from How to restructure your account – Helium 10