In this post we cover how to start Amazon PPC for a newly-launched product.
First, congrats! There is a lot to do at this stage and I’m sure you want to spend as little time as possible on ads.
Toward that goal, here are our recommended steps. This guide is only intended for a single product/SKU. Products with variations are more complicated and will be covered later.
Here are the steps:
- Get a few reviews before starting ads.
- Create two campaigns: Auto and Manual Broad
- Add starter list of keywords to Manual Broad
- Set a default bid
- Decide on a reasonable overall budget, and split it 50-50
- Gradually create more Manual keywords from good Auto search terms
- Make good Auto search terms into Negative keywords in Auto
- Adjust budgets accordingly – Gradually shift money from Auto to Manual
- Set the right bids on those manual keywords. Adjust bids regularly based on the data.
- Make bad search terms into Negative Keywords to stop unprofitable ad spend
Let’s Get Started

#1 – Ideally – get a few reviews before starting ads.
It’s hard to commit to buying a product without at least a tiny bit of “social proof” in the form of a few reviews. Even 2-3 reviews can be sufficient for someone to decide to buy. Before you have those initial reviews, your ads are just not going to convert very well into sales, and will therefore be very expensive.
#2 – Set up Two Campaigns: 1 Auto, 1 Manual.
Start by creating one automatic campaign and one manual broad match campaign.
- The purpose of the auto campaign is to identify new good keywords to put into manual campaigns.
- The main purpose of the manual campaign, in the beginning, is also research. The words in Manual will just get more exposure faster, which is good because you suspect they will be good ones. A secondary goal is to start earning some money immediately and get search ranking improvements faster. But keep in mind, your ACoS might be high in the beginning.
Use a common-sense formula for naming, such as “Magic Wand – Manual Broad” for easy analysis.
Again, this guide is focused on a single-SKU product launch, but if you have multiple variations, be sure to create a separate ad group per SKU. This allows you to optimize each SKU since each variation might perform differently.
You’ll add more manual campaigns later for phrase and exact match types. But for the first few weeks, stay simple my friend.
#3 – Add a starter list of keywords to the Manual Broad Campaign
For the manual campaign, you’ll need a list of likely good keywords to get started. There are lots of tools out there to help find keywords, like KeywordInspector, Google Keyword Planner, and your brain. What is your target customer likely to search?
Enter this listinto your manual campaign.
#4 – Set a default bid
You’ll need to set a default bid. This is an art, not a science, and you’ll get better at this as you learn about your market. A good place to start is a $0.50 default bid for non-competitive markets, $1.50 for average markets, and $3 for competitive markets.
In the auto campaign, this should be reduced after most of the good keywords have been moved to the manual campaign.
#5 – Decide on a reasonable overall budget, and split it 50-50 between Auto and Manual
Decide how much you are willing to spend per day and set a budget. $10? $500? It is an investment in buying information – the more you spend at the outset, the faster you will learn which keywords drive your sales.
How to distribute the money? Split your overall budget about 50-50 between the auto and the manual to start. As you find good keywords and move them to manual campaigns, gradually reduce the spend on your auto and move it to the manuals.
How much? Spend no less than $10/day for each campaign if at all possible (below that, it will take way too long to get enough impressions). Set aside at least $100 total for searching for good new keywords via the automatic campaign – that’s a little less than two weeks at $10/day. Even better would be $500. Again, this will vary based on how much the competition is paying for these keywords. And ultimately, it all depends whether you want the process of finding good keywords to take 2 weeks or 2 months. Yes, launching a product successfully is expensive at first. It’s worth it though!
If you don’t get many impressions (because it’s a niche market or your bids are too low), this process could take a month or even two. If you see huge volume, it could take just a few days.
#6 – Gradually create more Manual keywords from good Auto search terms
Gradually move good search terms from the auto campaign into new keywords in the manual campaign. (Remember, auto campaigns don’t have keywords, just search terms. Amazon decides on the fly which customer search terms to match to your product.)
When I say “move keywords”, I mean “find the search terms that are working the best in the Auto campaign and create keywords from them in manual campaigns”. So keep an eye on search terms in Auto and start pulling them out as they get volume.
In terms of timeline, this should happen as quickly as 4-5 days after starting ads and continue for several weeks. (Note that Amazon usually doesn’t report full sales from your ads until 2 days have passed.) The more traffic a keyword has, the faster you’ll know if it’s good/bad.
#7 – Make good Auto search terms into Negative keywords in Auto
You know those Auto search terms that you made into keywords in Manual? Don’t forget to make them into Negative exact keywords in the auto campaign. Why? It is not because you’ll somehow bid against yourself. Rather, it is simply to ensure that your auto budget goes toward additional research words instead of bidding on keywords that are already getting good exposure in the manual campaign.
#8 – Adjust budgets accordingly – Gradually shift money from Auto to Manual
As you move keywords from auto to manual, move a matching amount of ad spend over too.
Example: If you move four keywords and each is spending $2/day, increase the manual campaign budget by $8 and reduce the auto budget by $8. This doesn’t need to be exact; you just want to your money to go toward the most cost-effective keywords.
#9 – Set the right bids on manual keywords & adjust bids regularly
Bids will vary by keyword. More competitive keywords (for example, ‘spatula’ or ‘cell phone case’, or supplements) will require a much higher bid than niche products.
Assuming your product is not hyper-competitive, I would start with a bid at 125% of the CPC (Cost per Click) from the Auto campaign. (Another option is to set the bid in the middle of Amazon’s suggested range.) You’ll then adjust it continually based on performance. You need to do this analysis for every keyword, ideally, or at least the high-spend ones if you don’t have time to look at all of them.
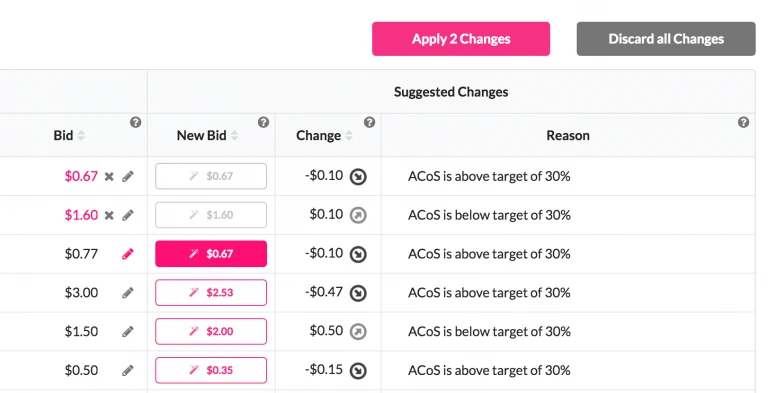
I must of course note here that Prestozon’s whole reason for existing is to automate this analysis and give you data-based suggestions for keyword bids. One click to accept and apply the new bids from Bid Wizard, so it’s a good option to free up time.
#10 – Make bad search terms into Negative Keywords (in both Manual and Auto) to stop unprofitable ad spend
Don’t just look for the good search terms! Take the bad ones out of commission with Negative Keywords as well.
This is one of the best ways to improve your ACoS – get rid of high-ACoS search terms in both your Auto and Manual campaigns, especially if you seeded your manual campaign with guesses at the outset.
The End Goal: One small but continually running Auto campaign for research purposes
After a month or two of transitioning spend from auto to manual, you’ll end up with an auto campaign that is only spending a few dollars a day. You want to keep this running to keep finding those occasional long-tail keywords that are cheap and uncommon but have a great ACoS for your product.
Even several years in, you’ll continue to find these occasional golden keywords as markets are constantly changing.
That’s all for now, folks.
Thanks for reading! I hope this was helpful.
Reach out at any time with questions, or comment below. We’ll respond!
Original post from The Guide: How to Start Amazon Ads for New Products – Helium 10


